Angular Chat-bot using Dialog flow(API.AI)
I have seen many posts on how to build a chatbot for a wide variety of collaboration platforms such as Slack, Facebook Messenger, and HipChat. So, I decided to build a chatbot from scratch to production using Angular and DialogFlow.
I. Introduction
In early 2015, people started using messaging applications more than they use social networks.This is a significant shift and a huge turning point in how consumers consume information. Up until 2015, to market a business online, we would use social networks – as this is where the consumers were. Now, there is a better place to concentrate resources.
Businesses that seize opportunity are the ones that follow consumers the fastest.Think back to 5 or so year ago.“There’s an app for that” – said, everyone.Now it is probably too late for a business to create an app, similar functionality can probably be better delivered elsewhere. I certainly do not think any sane person would form an app-building start-up.It is not just consumer trends.
Another contributing factor is the commercial opportunity, and therefore, interest from large (wealthy) companies. The platforms that enable the delivery of chatbot experiences are opening up to larger audiences and more innovative ways of creating an ROI and user interaction are being rapidly developed.
It is the culmination of the consumer behavior (moving to message apps) and the technology is ready, along with a greater cultural shift in consumer behavior.
People have been using messaging apps (and SMS) to talk with friends and family for long enough to feel confident in using the same practices to communicate with a business. This coincides with businesses now having the tools and technology to effectively communicate through the apps in a way consumers require.
The near-future potential is quite apparent. No longer will consumers have to trawl through websites and search engines to find the information they need. Instead, they will be communicating with intelligent chatbots at every stage.
II. What are ChatBots?
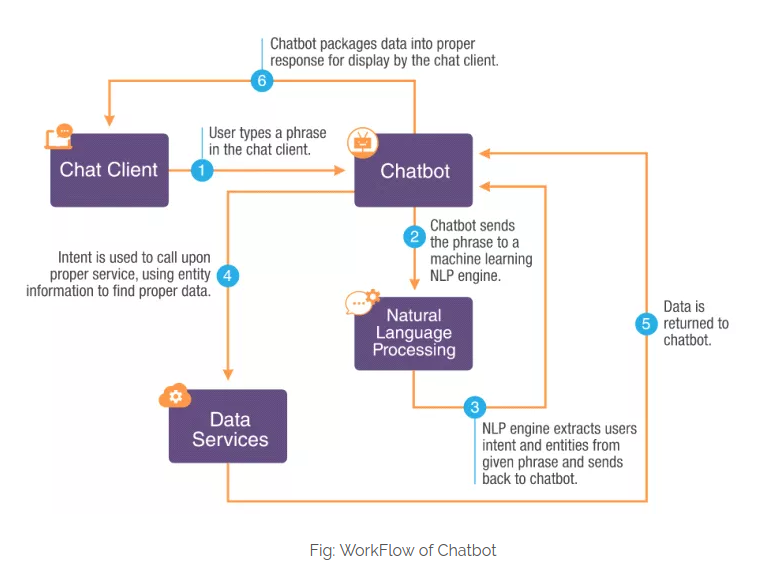
A chatbot is a program that communicates with you. It is a layer on top of, or a gateway to, a service. Sometimes it is powered by machine learning (the chatbot gets smarter the more you interact with it). Or, more commonly, it is driven using intelligent rules (i.e. if the person says this, respond with that).
The chatbot can talk to you through different channels; such as Facebook Messenger, Siri, WeChat, Telegram, SMS, Slack, Skype, and many others.
Consumers spend lots of time using messaging applications (more than they spend on social media). Therefore, messaging applications are currently the most popular way companies deliver chatbot experiences to consumers.
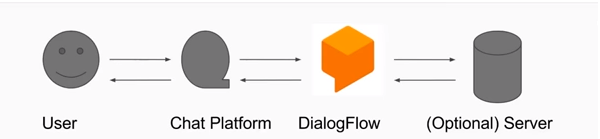
III. How do ChatBots Work?
a) What is Dialog Flow?
Dialogflow (formerly Api.ai, Speaktoit) is a developer of human-computer interaction technologies based on natural language conversations. The company is best known for creating the Assistant (by Speaktoit), a virtual buddy for Android, iOS, and Windows Phone smartphones that perform tasks and answers users’ question in a natural language.[1] Speaktoit has also created a natural language processing engine that incorporates conversation context like dialogue history, location, and user preferences.
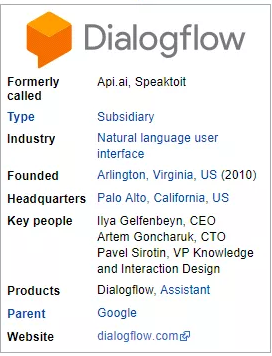
Google bought the company in September 2016 and was initially known as API.AI; it provides tools to developers building apps (“Actions”) for the Google Assistant virtual assistant. It was renamed on 10 October 2017 as Dialog flow.
Voice and conversational interfaces created with Dialog flow works with a wide range of devices including phones, wearables, cars, speakers and other smart devices. It supports 14+ languages including Brazilian Portuguese, Chinese, English, Dutch, French, German, Italian, Japanese, Korean, Portuguese, Russian, Spanish and Ukrainian. Dialog flow supports an array of services that are relevant to the entertainment and hospitality industries.
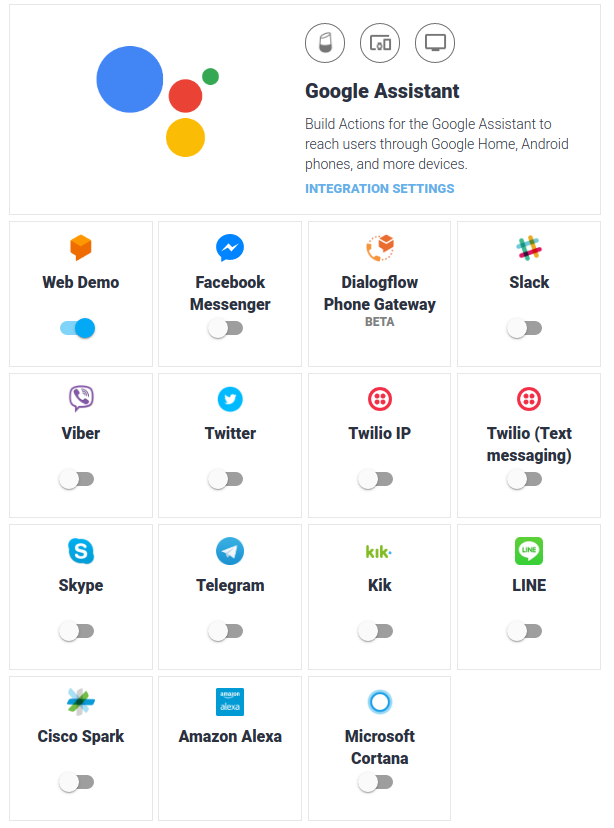
b) Types Of Integration Available In Dialog Flow?>
Using Dialog Flow, we can build once and deploy to 14 platforms using dialog flow’s one-click integrations.
Following are the integrations that the dialog flow offers.
IV. Case Study
V. Implement ion (Angular 4)
Step 1:
Here we are using v4.2 or later
npm install -g @angular/cli
# Install Required Libraries
Step 2:
This application has only one extra dependency – the DialogFlow JavaScript SDK. It is written in TypeScript, so we can install it to the dev dependencies.
npm i api-ai-javascript -D –save
Step 3:
We need to add the Angular Forms Module to the imports and add the Chat Dialog Component to exports.
/// chat.module.ts
import { NgModule } from '@angular/core';
import { CommonModule } from '@angular/common';
import { FormsModule } from '@angular/forms';
import { ChatService } from '../chat.service';
import { ChatDialogComponent } from './chat-dialog/chat-dialog.component';
<b>@NgModule</b>({
imports: [
CommonModule,
FormsModule
],
declarations: [
ChatDialogComponent
],
exports: [ ChatDialogComponent ], // <-- export here
providers: [ChatService]
})
export class ChatModule { }
Step 4:
Then import the chat module into the app module
import { BrowserModule } from '@angular/platform-browser';
import { NgModule } from '@angular/core';
import { AppComponent } from './app.component';
import { ChatModule } from './chat/chat.module';
<b>@NgModule</b>({
declarations: [
AppComponent
],
imports: [
BrowserModule,
ChatModule
],
providers: [],
bootstrap: [AppComponent]
})
export class AppModule { }
Step 5:
Now we have to call this app Component where ever we want the functionality to be enabled. Currently, in our application, we used it in index.html
<!-- app.component --><app-chat-dialog></app-chat-dialog>
VI. Buildding A Basic Dialog Flow Agent
There are several steps what you have to follow in Dialogflow.
#1 Create an Agent
An Agent is essentially a container for a chatbot. We should try to give them tasks that they can solve easily – set them up for success. In this application, I am giving my agent a name called Trialbot.
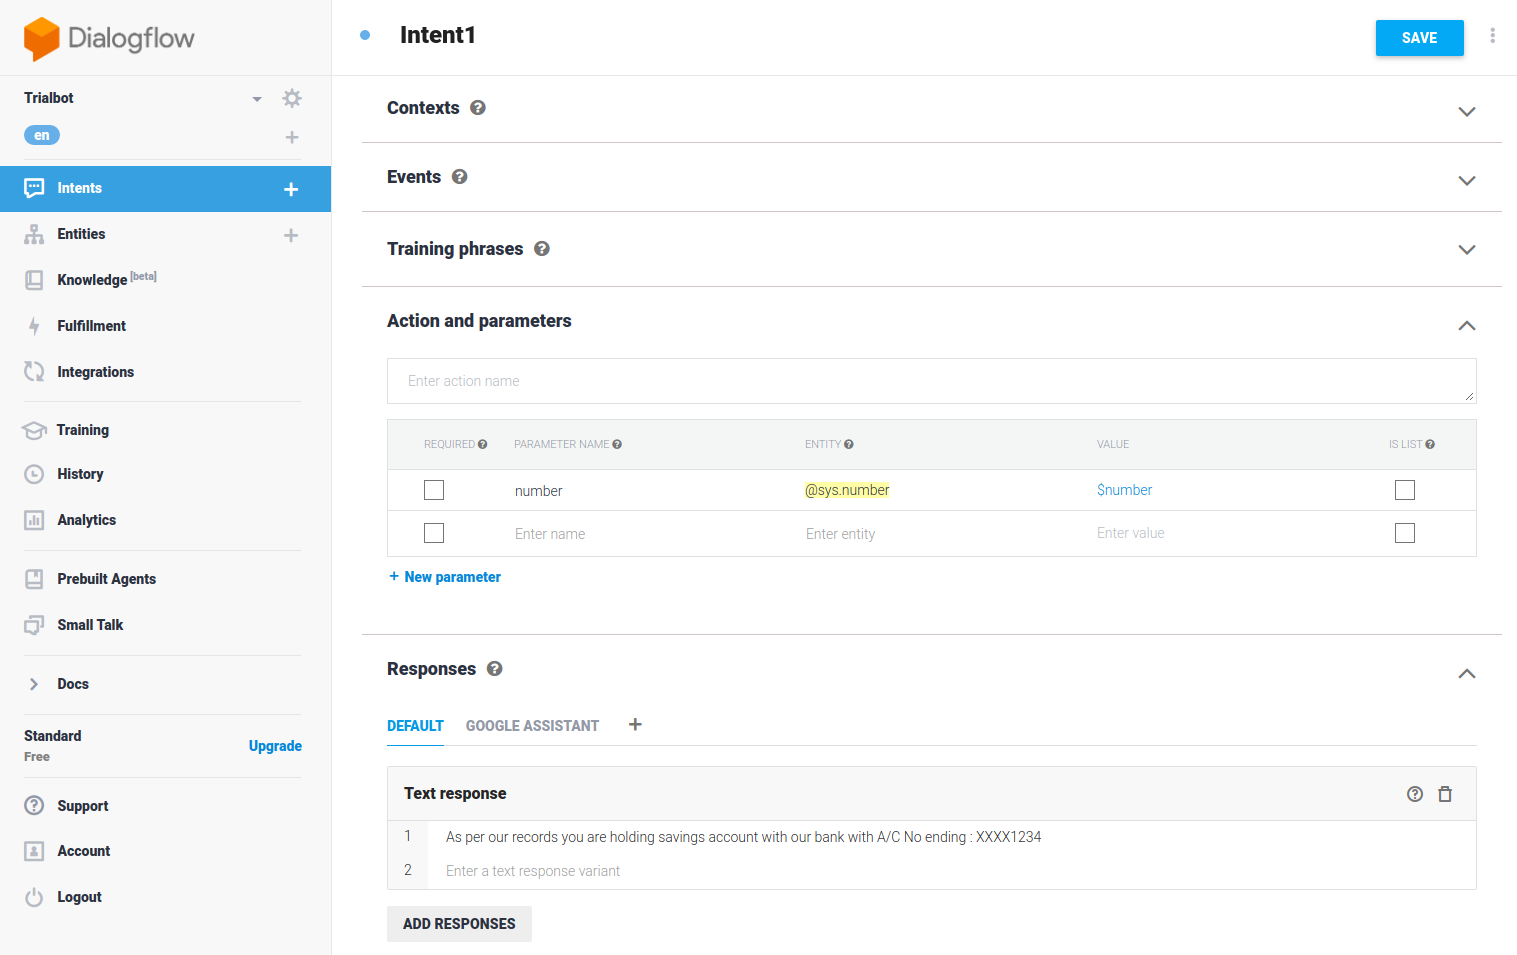
#2 Create an Intent
An intent is something your user is trying to accomplish. Here’s how the cycle works.
- A user invokes an intent by asking “How do I do XZY”?
- Bot recognizes question
- Attempts to fulfill the intent by asking more questions or doing something on the backend.
Here is a sample of simple intent.
- Add a user expression “I would like to order a pizza” common question you would expect a user to ask, also adding multiple variants to optimize the algorithm.)
- Add a text response “Can you please tell which type of pizza do you want?” (This is what the bot will say when it recognizes this user question).
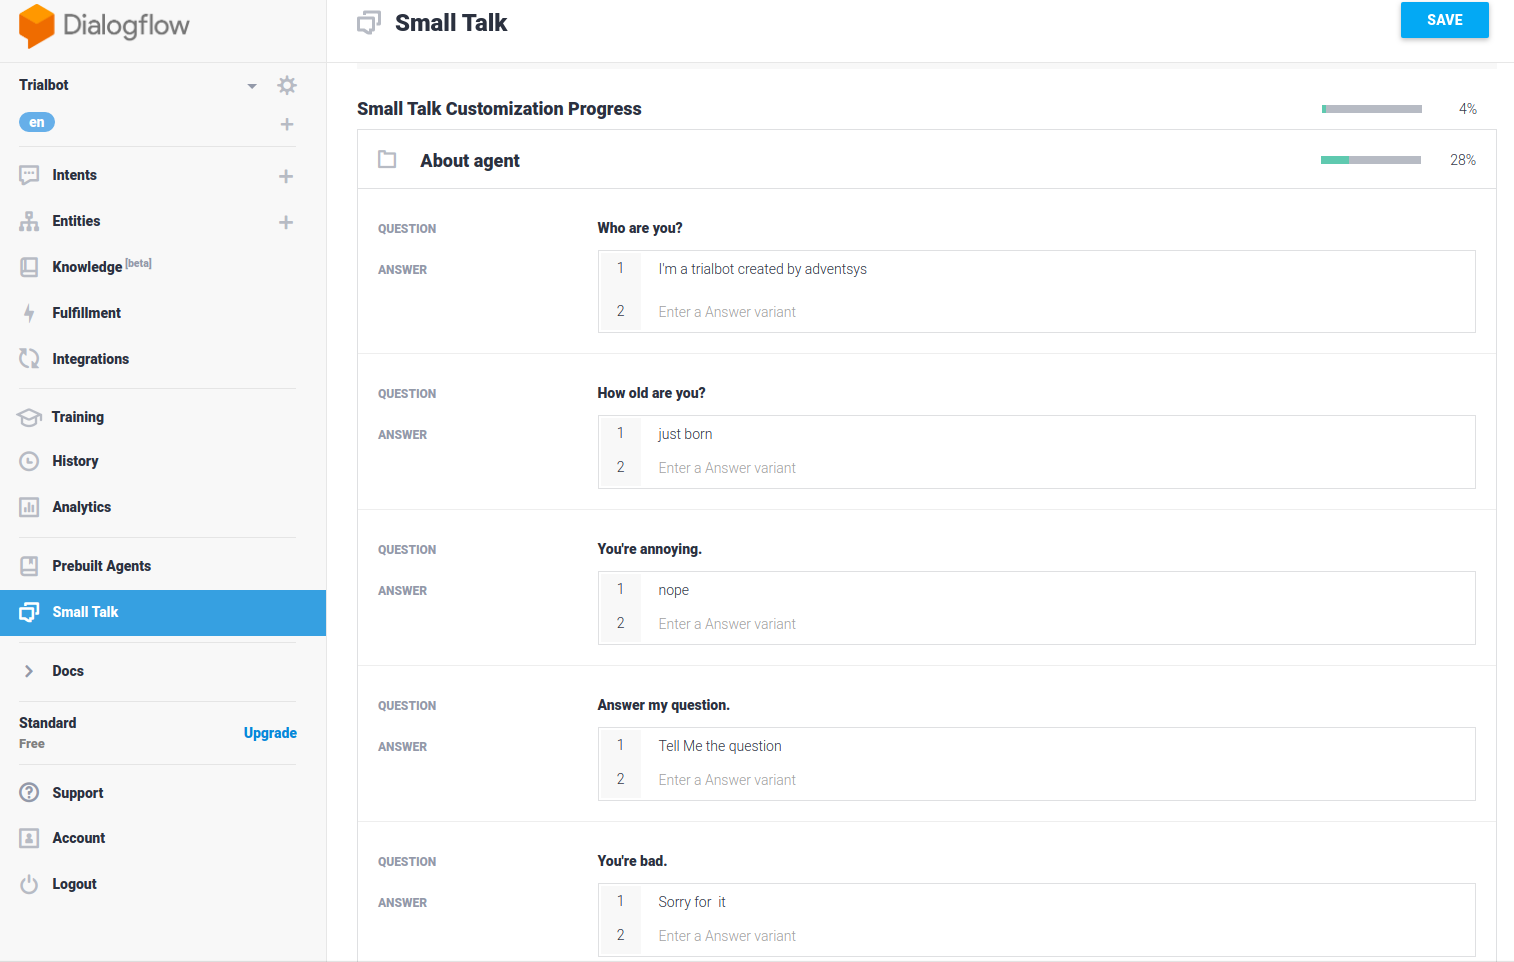
#3 Creating Small Talk
Here we are enabling the feature that can easily program our bot for common chit-chat style questions in the Small Talk panel. This will give our bot a Siri or Alexa-like level of interactivity. So Programmed it to give funny or intelligent responses.
Using the Chatbot Agent in Angular
Now that we have a basic agent, let’s see how we allow a user to send and receive messages in the Angular UI.
#4 Add the API Key to the Environment
First, copy and paste the Client access token from the main Agent page in Dialogflow.
Then include the API token into /environments/environment.ts file.
export const environment = {
production:false,dialogflow: {
angularBot:'YOUR_CLIENT_TOKEN'
}
};
# Chat Service
The chat service will make the API call to Dialogflow. Here’s a breakdown of the important parts.
- Create a Message class to format messages
- Initialize Dialogflow (ApiAiClient) with your API token.
- Define a BehaviorSubject that is an array of messages.
- The converse method adds a user message to the array, then hits the API and updates the bot’s response in the same array.
# chat.service.ts
import { Injectable } from '@angular/core';
import { environment } from '../../environments/environment';import { ApiAiClient } from 'api-ai-javascript';import { Observable } from 'rxjs/Observable';
import { BehaviorSubject } from 'rxjs/BehaviorSubject';
// Message class for displaying messages in the component
export class Message {
constructor(public content: string, public sentBy: string) {}
}
<b>@Injectable</b>()
export class ChatService {readonly token = environment.dialogflow.angularBot;
readonly client =
new ApiAiClient({ accessToken: this.token });conversation =
new BehaviorSubject<Message[]>([]);
constructor() {}
// Sends and receives messages via DialogFlow
converse(msg:string) {
const userMessage = new Message(msg, 'user');
this.update(userMessage);
return this.client.textRequest(msg)
.then(res => {
const speech = res.result.fulfillment.speech;
const botMessage = new Message(speech, 'bot');
this.update(botMessage);
});
}
// Adds message to source
update(msg: Message) {
this.conversation.next([msg]);
}}
Now we just need a user interface(UI) that can send and receive messages.
Dialogchat-dialog.component.ts
To maintain an Observable array that can be appended with new vales, I am using the RxJS scan operator. Each time thein the service emits a new value, it will be concatenated to the previous value.
import { Component, OnInit } from '@angular/core';
import { ChatService, Message } from '../chat.service';
import { Observable } from 'rxjs/Observable';
import 'rxjs/add/operator/scan';

@Component({
selector:'chat-dialog',
templateUrl:'./chat-dialog.component.html',
styleUrls: ['./chat-dialog.component.scss']
})
export class ChatDialogComponent implements OnInit {messages: Observable<Message[]>;
formValue:string;
constructor(public chat: ChatService) { }ngOnInit() {
// appends to array after each new message is added to feedSource
this.messages = this.chat.conversation.asObservable()
.scan((acc, val) => acc.concat(val) );
}sendMessage() {
this.chat.converse(this.formValue);
this.formValue = '';
}}
In the HTML, we can now loop over the messages observable. We are using ng Class on each message to apply a conditional to/from class which is determined if the message came from a human or chatbot. Lastly, We set up a form with ngModel that sends the message when the enter key is pressed.
chat-dialog.component.html
<h1>Angular Bot</h1>
<ng-container *ngFor="let message of messages | async">
<div class="message" [ngClass]="{ 'from': message.sentBy === 'bot',
'to': message.sentBy === 'user' }">
{{ message.content }}
</div>
</ng-container>

<label for="nameField">Your Message</label>
<input [(ngModel)]="formValue" (keyup.enter)="sendMessage()" type="text">
<button (click)="sendMessage()">Send</button>
chat-dialog.component.css
We are using theMiligram CSS framework for some basic styling in this demo. Add the following lines to the index.htmlfile to use them via CDN.
<!-- CSS Reset -->
rel="stylesheet" href="//<a href="http://cdn.rawgit.com/necolas/normalize.css/master/normalize.css"><u><b>cdn.rawgit.com/necolas/normalize.css/master/normalize.css</b></u></a>"><!-- Milligram CSS minified -->
rel="stylesheet" href="//<a href="http://cdn.rawgit.com/milligram/milligram/master/dist/milligram.min.css"><u><b>cdn.rawgit.com/milligram/milligram/master/dist/milligram.min.css</b></u></a>">
We created some custom CSS styles.
.message {
border-radius: 50px;
margin: 0 15px 10px;
padding: 15px 20px;
position: relative;
font-weight: bold;
}
.message.to {
background-color: #2095FE;
color: #fff;
margin-left: 100px;
text-align: right;
}
.message.from {
background-color: #E5E4E9;
color: #363636;
margin-right: 100px;}
.message.to + .message.to,
.message.from + .message.from {margin-top: -10px;
}
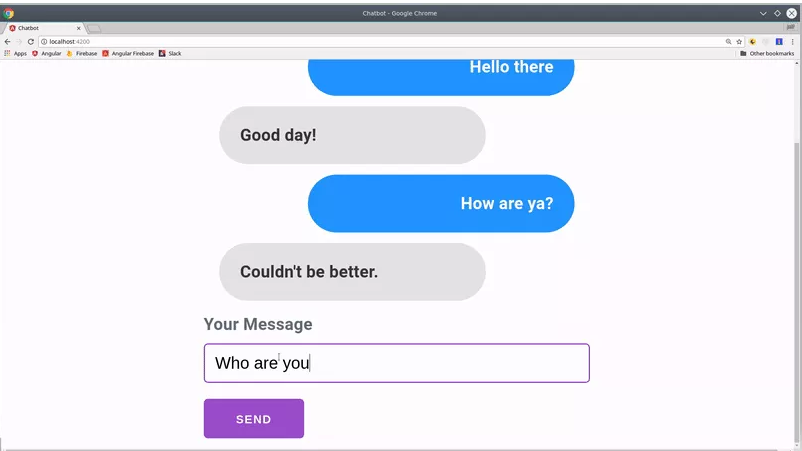
The chat screen should look some what like this
Author

Raghu Ravi
Comments (0)